Exploring executable JARs with the Spring Boot Plugin
I frequently find myself starting new Spring Boot projects by adding the Spring Boot Maven Plugin to the POM, without giving a moment’s thought as to how it goes about producing a self-contained executable JAR. In a frequent push to understand more about Spring, I thought I’d explore this often overlooked process.

Let’s start by looking at how one uses the plugin…
Getting Started
To bind the Spring Boot Maven plugin to Maven’s package phase, add the plugin to your Spring Boot Application’s POM.
It’s worth mentioning that there is also a Gradle version of the plugin, but I’ll be focussing on the Maven version.
<project>
   ...
   <build>
      <plugins>
         <plugin>
            <groupId>org.springframework.boot</groupId>
            <artifactId>spring-boot-maven-plugin</artifactId>
            <version>1.5.8.RELEASE</version>
         </plugin>
      </plugins>
   </build>
</project>
Running Maven’s package phase is all you need to do for the plugin to create a much enhanced executable “fat” JAR in your target directory. This “fat” JAR contains all of the dependencies necessary to be able to run it anywhere you have Java.
$ mvn clean package
$ java -jar target/demo-1.0.0-SNAPSHOT.jar
Size difference
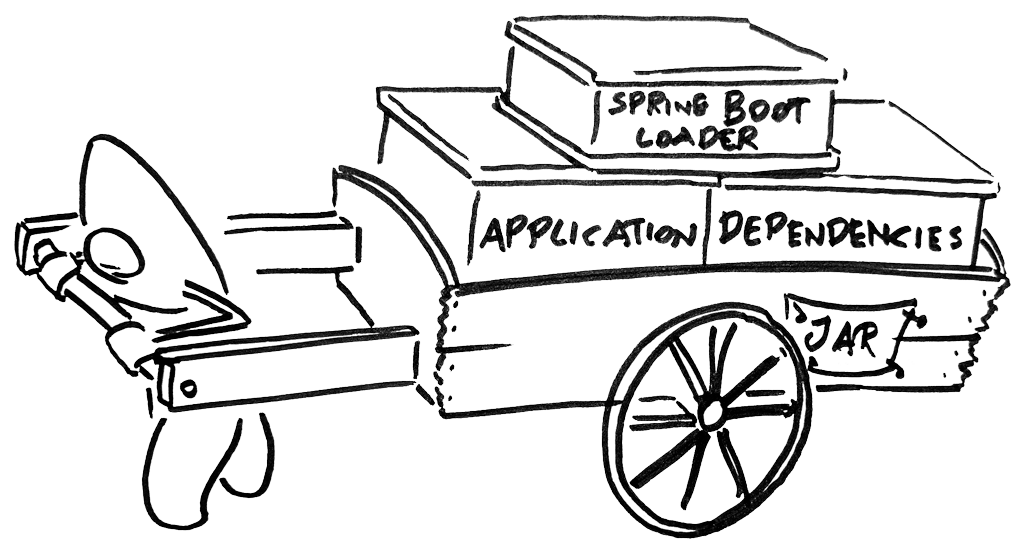
The resulting executable JAR is much larger than the original, since it now contains along with the application’s classes, all of its dependencies and the Spring Boot Loader module (more on that later).
$ du -sh target/demo-0.0.1-SNAPSHOT*
 14M    target/demo-0.0.1-SNAPSHOT.jar
4.0K    target/demo-0.0.1-SNAPSHOT.jar.original
If the new JAR is too large for your liking, then read on, as next we’ll have a look at how to extend the plugin and how this can be used to make the JAR download its own dependencies.
Extending the plugin
The plugin comes with the ability to influence the resulting JAR by implementing a custom Layout.
The default layouts create a “fat” JAR or WAR; but there are other layouts, such as the third-party thin launcher which results in a “thin” executable JAR that downloads its dependencies instead of bundling them in and greatly reduces the size of the resulting JAR.
To add a custom layout, add it as a dependency of the plugin, in this case version 1.0.7.RELEASE of the Thin layout.
<project>
   ...
   <build>
      <plugins>
         <plugin>
            <groupId>org.springframework.boot</groupId>
            <artifactId>spring-boot-maven-plugin</artifactId>
            <dependencies>
               <dependency>
                  <groupId>org.springframework.boot.experimental</groupId>
                  <artifactId>spring-boot-thin-layout</artifactId>
                  <version>1.0.7.RELEASE</version>
               </dependency>
            </dependencies>
         </plugin>
      </plugins>
   </build>
</project>
Now during Maven’s package phase, the plugin scans the class path for implementations of the Layout, which in turn can influence the resulting artefact. In Thin Launcher’s case, this means preventing the bundling of dependencies and setting itself as the main-class so it can download them when the JAR is started.
$ mvn clean package
$ du -sh target/demo-0.0.1-SNAPSHOT*
 12K    target/demo-0.0.1-SNAPSHOT.jar
4.0K    target/demo-0.0.1-SNAPSHOT.jar.original
The resulting executable “thin” JAR is now only 12 kilobytes! - But alas, everything comes at a price, and in this case it means the first execution of the JAR will be slower, whilst it automatically downloads and caches the dependencies that would have otherwise been bundled in with it.
How it works
To better understand what the Spring Boot Maven plugin has produced, let’s crack open the JAR, skim the documentation and see what magic happens under the hood!
Dependencies
With no standard on nesting JARs inside a self-contained executable JAR, developers had to turn to plugins such as the Shade Plugin, which bundles the dependency’s classes into an “uber” JAR. However, this can introduce the risk of conflicting filenames between the dependencies and make it harder to see which dependencies are being used.
Spring Boot’s solution to this is to nest the JARs themselves and use a module called Spring Boot Loader to bootstrap the loading of these at runtime using the org.springframework.boot.loader.JarLauncher class.
JAR directory structure
If we extract the contents of an executable JAR, we are presented with the following “Spring Boot Loader” compatible structure.
demo-0.0.1-SNAPSHOT.jar
├── BOOT-INF
│   ├── classes
│   │   └── com/example/demo
│   │       └── DemoApplication.class
│   └── lib # Dependencies
│       └── <...>.jar
├── META-INF
│   └── MANIFEST.MF # Manifest definding the main-class for JVM to run
└── org/springframework/boot/loader
    └── <...> # Classes for Spring Boot Loader
The most notable parts of this structure are:
org/springframework/boot/loader- The Spring Boot loader code for unpacking classes inside JARs and running the Spring Boot Application’s main method are contained at the root of the structure (more on that in the next section)BOOT-INF/lib- All dependencies for the Spring Boot application stored as internal JARs
Stepping through
Now with the knowledge of the Spring Boot Loader, nested JARs and the directory structure, let’s step through how the Spring Boot Application is loaded…
- The Java command is passed the self-contained JAR file
$ java -jar demo-0.0.1-SNAPSHOT.jar - The META-INF/MANIFEST.MF is read, of which the two most pertinent entries are:
Main-Class: org.springframework.boot.loader.JarLauncher Start-Class: com.exmaple.demo.DemoApplication - The JVM runs the Main-Class defined in the manifest, which is the JarLauncher. This loads all the nested dependency JARs contained in the
BOOT-INF/libdirectory to the classpath - The main method of the Spring Boot application (defined by the
Start-Classproperty in the manifest) is then invoked - Following the invoking of its main method, the Spring Boot application can now start, with all its dependencies loaded onto the classpath
Although brief, given the flexibility of the plugin, hopefully this article has helped you understand how to use the plugin and what it is doing when used. If you have a craving to know more, then check out the Maven Plugin’s documentation.