Getting Things Done (GTD) in KanbanFlow
KanbanFlow is a simply decorated website with a clean design and an orientation towards, unsurprisingly, the Kanban methodologies. Thankfully, for someone like myself who likes its clean design, but has a preference for Getting Things Done (GTD) I was able to shoe-horn GTD into the KanbanFlow website with surprising success.
Below is how to use GTD with Kanban Flow - unfortunately some of the functionality requires a premium subscription (costing £4~ a month at the time of writing this).
Configuring the board
General
- Enable numbering of tasks to give each of them a unique ID
- Premium subscription
Columns
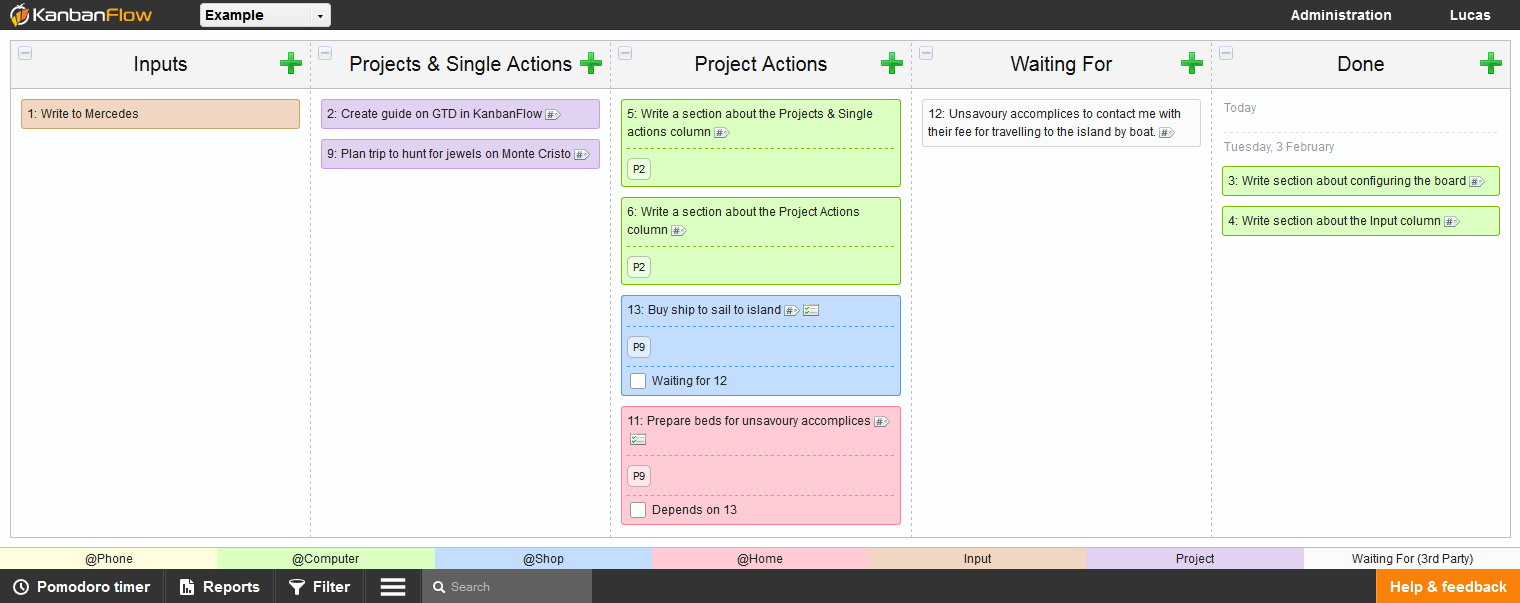
Configure the board to use the following common lists of GTD.
- Inputs
- Projects & Single Actions
- Project Actions
- Waiting For
- Done
Colours
The colours are mostly used as Contexts for each of the actions; the exception to this being Input, Project and Waiting For.
- @Phone
- @Computer
- @Home
- @Shop
- Input
- Project
- Waiting For (3rd Party)
Usage
Inputs column
The Inputs column contains ideas and notes that you should review every so often to determine what should be formalised and put into the ‘Projects & Single actions’ column.
Creating an Input
- Create a task in the Inputs column with the ‘Input’ colour
Filter everything except for Inputs
- Click filter at the bottom of the page - requires a premium subscription
- Filter by colour: “Input”
Projects & Single actions column
Within GTD, actionable tasks are generally singular. Actions that are too large are split into smaller actions and reference a Project.
This column contains the aforementioned singular actions and projects. The purpose of the Project task is to allow you to find all of its smaller actions within the Actions column.
Creating a Singular Actions
- Create a task in this column with a colour of its context
- Optional - If you want to filter by Singular Actions then give them a label such as ‘NOP’ (Not a Project) to filter by
Creating a Project
- Create a task within this column with the ‘Project’ colour
- Click ‘Save & Close’
- This will give the task a unique ID - due to numbering being enabled - which can be used by the project actions as a reference.
- Open the newly created task and then put its ID as a label. I prefix ‘P’ to this ID to clarify what the label means,
so our example would be ‘P123’.
- This will be the label used on all actions for this project, allowing for tasks specific to this project to be filtered by.
Project Actions column
The Project Actions column contains all project actions. They’re linked to their relevant project by using the project’s label which is created when Creating a Project.
Creating an action for a project
- Create a task in this column with a colour of its context
- Give it a label identical to the project that it is linked to - our example used the ID P123
- Options - If the action depends on another action being completed then:
- Give the task a subtask item similar to “Depends on Actions 456” (456 being the ID of the action it depends on)
- Once you have completed the action being depended on then you can mark the subtask as completed
- Give the task a subtask item similar to “Depends on Actions 456” (456 being the ID of the action it depends on)
Listing all actions for a project
- Click on Filter at the bottom of the page - requires a premium subscription
- Filter by the project’s ID label, our example is ‘P123’ Animation showing filtering by projects
Waiting For column
The Waiting For column contains tasks indicating what you’re waiting for before an action can be completed.
Creating a Waiting For task
- Create a task in this column with a colour of ‘Waiting For’.
- Give it a label identical to the project that it is linked to - our example used the ID ‘P123’.
- Find the action that is waiting for this task to complete.
- Once found the create a Subtask with the text “Waiting fir 456” - 456 is the ID for the Waiting For task.
After the task you’re waiting for has been completed then you;re able to move it to the Done column and then tick the Subtask on the action that was waiting for it to complete. You then know you can continue with the action.
Done column
The done column is quite self explanatory, it’s where tasks are put when they have been completed.