Password Cracking Cluster - Part 1: Creating the cluster
Until recently my home was strewn with old laptops of all different specifications, their only purpose was to act as toe-stubbers and hamster obstacles; that was until I decided to turn them into a beowulf cluster, and what could be more fun than using their distributed compute for cracking passwords!

TL;DR; View the Ansible-MPI-Cluster GitHub repo to see it in all its glory. In part 2 I’ll be adding password cracking capabilities.
OpenMPI for distributed compute!
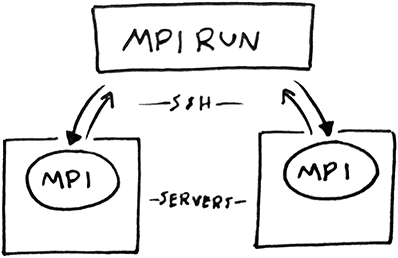
Working with the tools at my disposal I decided on the standardized and portable message-passing system called MPI to distribute the jobs. Using OpenMPI, an open source implementation of this, I could distribute jobs across the cluster with only SSH and shared directory.
Another reason for my decision was that a popular password cracker called John the Ripper (JtR) can utilise OpenMPI for parallelizing hashing functions.
Automating configuration with Ansible
Manually configuring multiple machines can be a laborious and error prone business for a human, let alone for one like myself. So I ended up using Ansible to automate the configuration of the cluster. By providing list of the hosts and their desired states it can take care of the rest with only Python and an SSH connection.
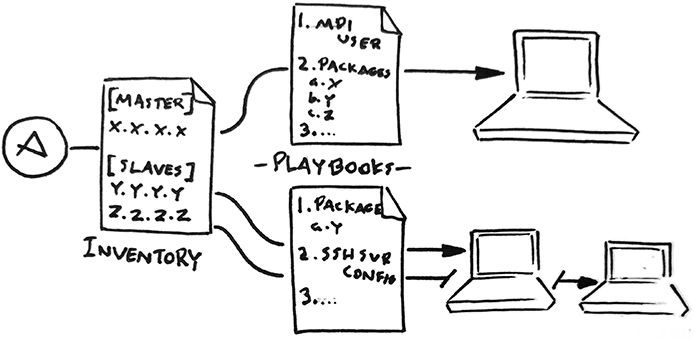
To further explain the simplicity of Ansible, it comprises of two main types of files:
- Inventory - this describes the nodes by network address and desired configuration, in this case they’re either a Master or Slave.
- Playbooks - YAML files that define the ‘state’ of a configuration. These files list the configuration/state that you want the machines to have .e.g. to have a user with certain access rights and packages x, y and z to be present.
Testing and developing without a physical cluster
Automated testing and developing on-the-go both require a virtual cluster. This is where Vagrant comes into the fray; the final major technology in the stack.
In my case Vagrant manages the creation of a virtual cluster based on the contents of the vagrantfile. I have implemented it so that it:
- Can create a variable amount of Ubuntu slave VMs
- Setups a private network between the master and slave VMs
- Uses the Ansible Provisioner to dynamically create an inventory file
Putting it all together
I’ve refrained from detailing the steps Ansible takes to setup an OpenMPI cluster, though I dearly wanted to. Instead I’ve endeavoured to make the Playbooks self-documenting, so using the directory listing below you can have a poke around the files to see what they do:
vagrantfile                   # defines the virtual cluster for dev/testing purposes
provisining/                  # files used by Ansible
    site.yml                  # playbook for configuring new cluster from scratch
    master.yml                # playbook for configuring a master node
    slaves.yml                # playbook for configuring slave nodes
    test_cluser.yml           # playbook for testing MPI cluster
    group_vars/
        all.yml               # vars used when configuring cluster
    roles/
        geerlingguy.nfs/      # contains tasks for perform for setting up file shares
        mpi_base/             # contains tasks for base MPI dependencies
        mpi_master/           # contains tasks for configuring MPI on master nodes
        mpi_slave/            # contains tasks for configuring MPI on slave nodes
Seeing it in action
The easiest way to see it in action is to follow the Development section of the project’s readme.
At the end of provisioning via the site.yml file it will run a test to ensure the cluster is working with MPI, so you should be presented with an output as satisfying as the one below:
TASK [Output result of Hello World program] ************************************
ok: [master] => {
    "msg": [
        "Hello world from processor slave1, rank 2 out of 3 processors",
        "Hello world from processor slave2, rank 1 out of 3 processors",
        "Hello world from processor master, rank 0 out of 3 processors"
    ]
}
What’s next
My next step is to deploy the password cracker John the Ripper to utilise OpenMPI. I’ll leave you with a photo of what my fledgling beowulf cluster looks like: